

I just can't seem to quit making things with
There are just so many things buzzing around in my head to make...
in addition to the quilts that I have already made:)

One of the projects that I've been planning
is a table runner for the desk top in
I thought you might like
to see how I made it:)
to see how I made it:)
My friend Nedra works for
and she recently sent me some of their product to play with.
Thanks Nedra!!!
Thanks Nedra!!!

I chose to use the
6" braid paper for this project.
It also doubles as flying geese paper if you follow the black lines...
but if you follow the red lines you will get braids...
aka herringbone design:)

I chose to use this size because it works out perfectly
for the 5" precut squares of Gracie Girl:)
I also used a few 3 1/2" precut squares...
I cut them in half to use as a starting triangle for each braid section.

On the paper it will tell you what size
to cut your strips for the braids...
notice on this one that it
says to cut the 1 1/4" x 5".
It also says light and dark but
I just used all of the
Gracie Girl prints on mine.
(by the way...those are the large Clover green clips that I use to keep my rolls together after opening them)

You can get exactly 4 - 1 1/4" x 5" strips
from one 5" square with absolutely no waste.
YaY!
I stacked my squares 4 deep
and cut 16 at a time.
I used about 40 strips per paper section.
(That means I used about 70 - 5" squares for the whole runner)

I cut 7 lengths of the paper about 20" long.
I rolled it up and clipped the sides with two red Clover clips
to make it easier to handle when sewing.
I pinned a fabric triangle onto the paper...
lining it up with the red lines and about 1/2" hanging off the edge like this.
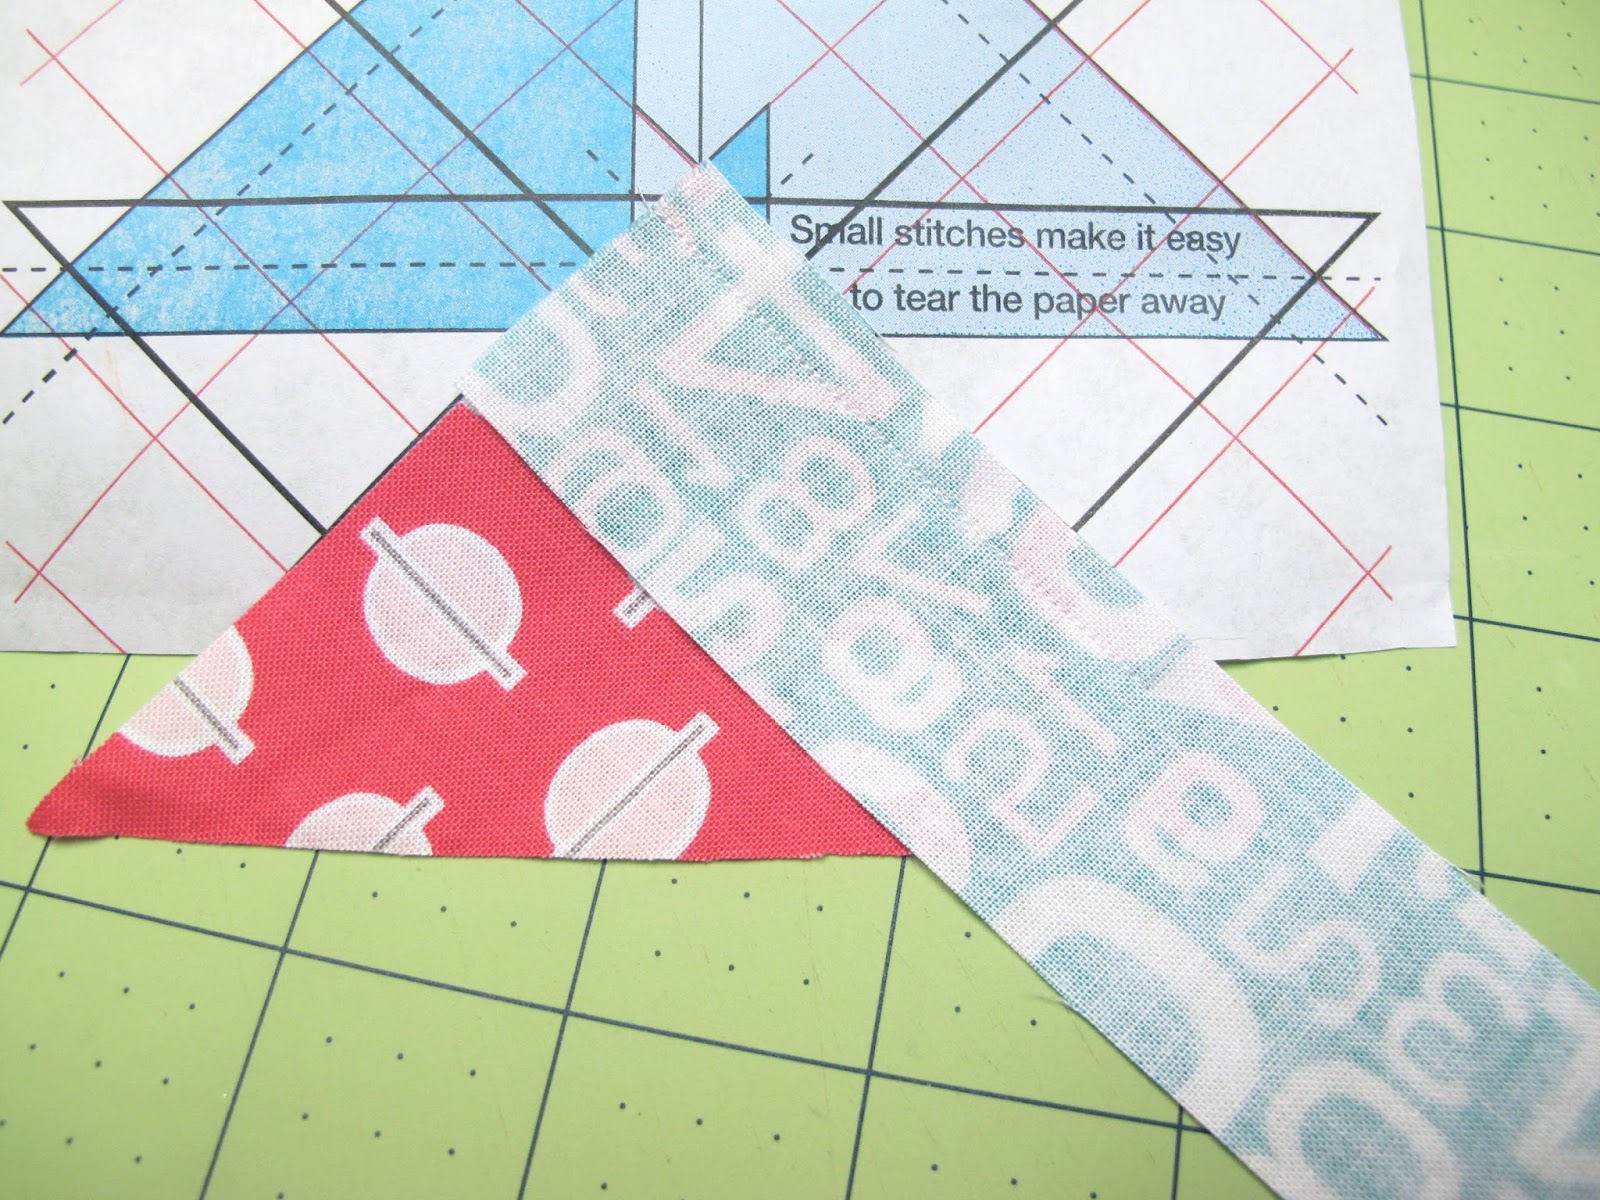
***Before you begin sewing you will need to shorten
your stitch length so that you also
perforate the paper while sewing.
This way...the paper will tear away
easily when it comes time to remove it:)
I lined up my first strip even withe triangle edges and stitched down...
using a 1/4" seam...
starting from the top and stitching past the edge of the paper a bit.
I did not back stitch.

I finger pressed it back like this...

and added the new strip on the left side ...
lining all edges up again...
stitched and finger pressed back.
If you use a 1/4" seam allowance and your strips
are cut correctly they should line up
on the red lines every time.

But sometimes you will notice that they are just a bit short of the red line...

like this.
But don't worry!
All you will do is place the next strip
on the red line and it will correct itself.
YaY!
That's what makes this paper so great
when working with small pieces.
You always have that line as a guide:)

Just keep adding on the strips until it covers the paper.

This is what mine looked like on the back.

One side hangs over more than the other...
no worries!
You have to trim off the edges of the fabric anyway:)

I trimmed off the fabric edges even with the paper on the sides...
and trimmed the ends so that each piece measured 18 1/2" long.

Then I removed the paper by tearing at the perforated lines:)

I cut 8 pieces of Jade (Riley Blake Solid)
1 3/4" x 18 1/2" for in-between herringbone sections...
and
2 pieces for the top and bottom of the runner...
1 3/4" x 47"
(i cut 3 - 1 3/4" x WOF and joined on the diagonal to use for the long strips)

Here I am getting ready to pin baste it for machine stitching.
I layered it with batting and backing fabric
that measures a little larger than the runner top.
(I like to use 100% cotton batting for table runners
and toppers so that they lay nice and flat)

***When I sewed the runner top together...
I alternated the direction of each herringbone.
I pressed all of my seams towards the green fabric.
Be careful when sewing the herringbone sections...
they will stretch if you let them because when
you trim them they are on the bias.
No worries though...
remember that
you are the boss!

All machine quilted and bound:)

I used a walking foot while quilting and used the edge as my guide for the width.

I did not quilt on the herringbone as I did not feel that it needed it...
that is totally up to you!

(however i did stitch in the ditch all the way around each herringbone section...not each strip...but around each of the 7 whole rectangle sections)

I used white thread for around the section and green thread on the solid fabric.

I loved the" triangle on a roll"papers
because I could cut them any length that
I needed for an exact fit for Kassidy's desk top.
It looks great in her room and will protect the painted surface ...
it seems to be a catch all place for everything!
I hope you enjoyed my tutorial on how to make a table runner
with cute and tiny patchwork herringbone sections!
Have a quilty kind of day...
xx
Lori
P.S. I also made a herring bone quilt using
3 1/2" Gracie Girl strips and no paper.
As soon as I get it back from the quilters next week...
I will do a tutorial on that too!


